Sunday, June 10, 2012

Handmade, Personalized Children's Growth Chart - Jungle Fever PART 2!!!!

I just posted about the second growth chart that I've done, the first of which I made for my cousin's daughter's first birthday, and the second was for my boss whose son was turning 1.  My boss's mom saw the growth chart and asked that I make one for her boss's son! I quickly obliged :)

Here are pictures of the first two that I did, and then pictures of Hayden's growth chart!


******


Cedar's Growth Chart 


Emry's Growth Chart


*******


Hayden's Growth Chart


This is how most of my growth charts start out.  I make a rough plan on paper (complete with personal reminders!!) in which I plan out fit and placement and sketch out how I want things to look.  I also make lists of the supplies I'll need for each element.  I try to be relatively organized when I start out because I hate hitting road bumps in the middle and messing with my progress! Of course, there are always changes to the original plan. As I go along, things seem to come together on their own sometimes, which can work out really well!


I then sketch out my plan on canvas and start placing the paper down without gluing it to see how things will look and if they will fit together well.  


Starting on the sky...


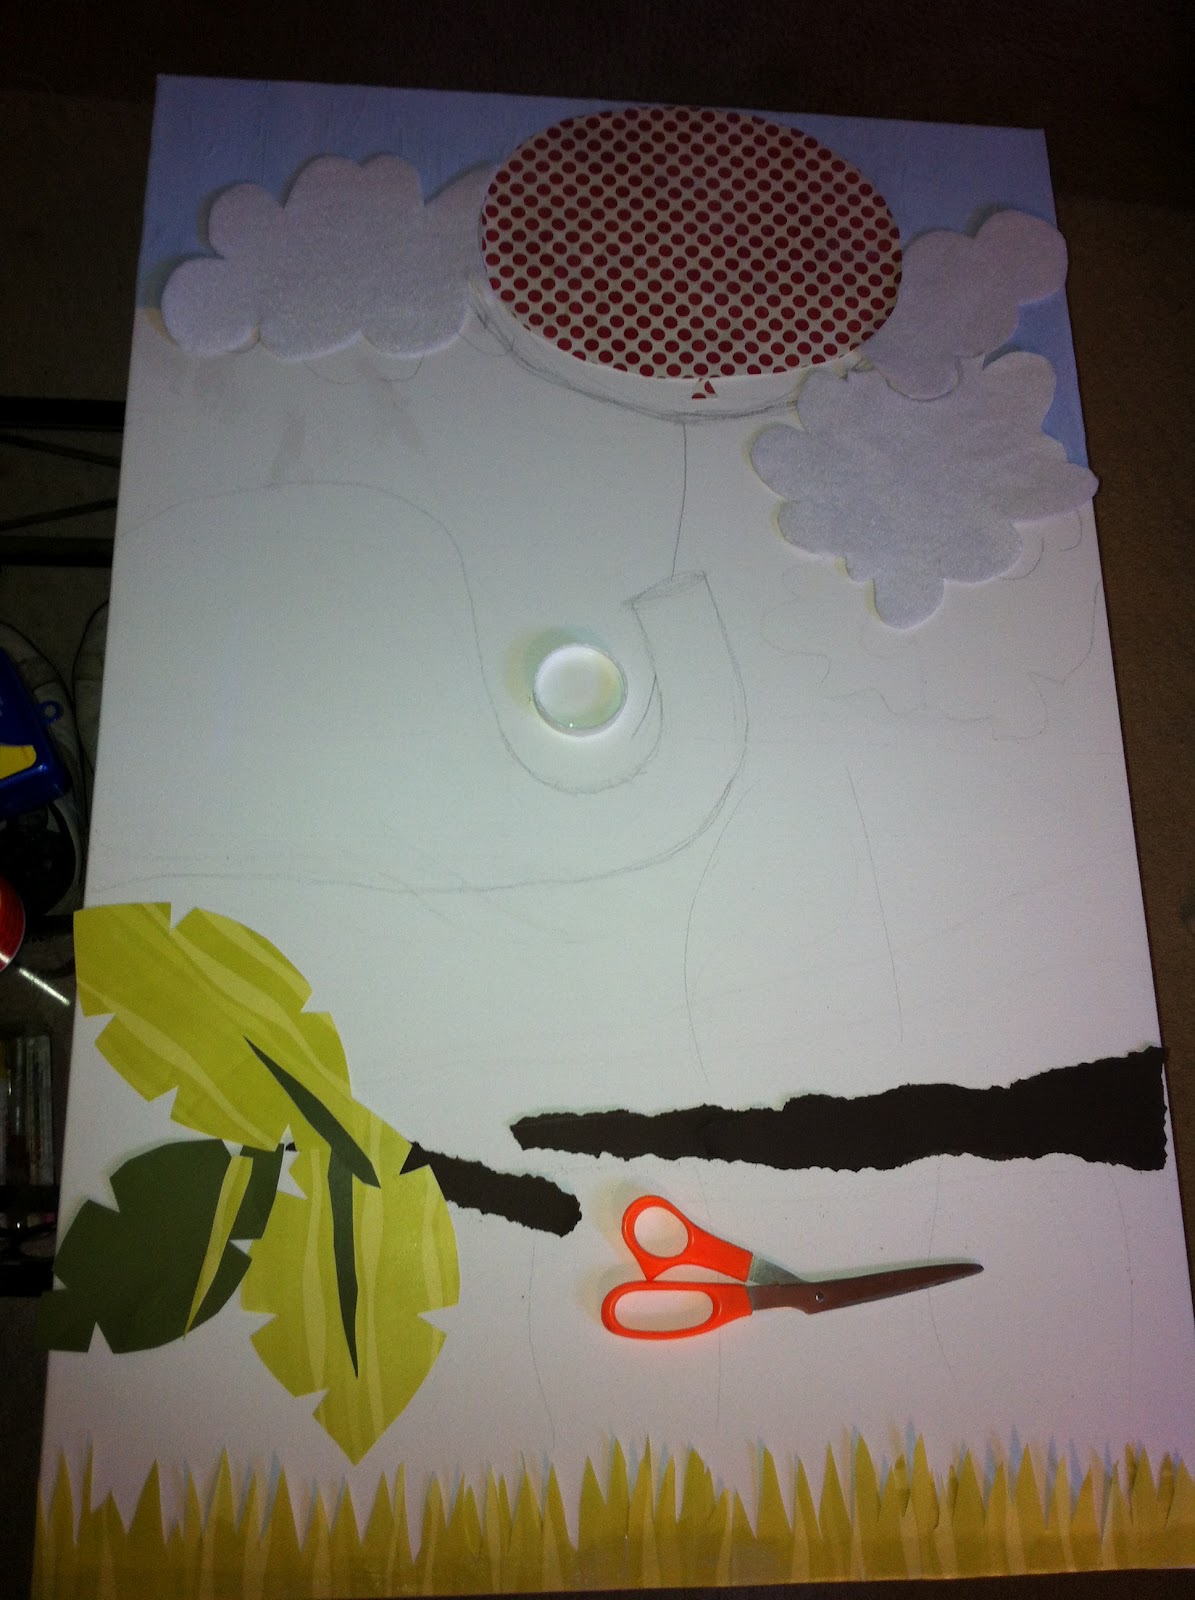
I didn't want to use tissue paper for the sky with this one, as I usually have with the other growth charts, and I found this amazing light blue paper that I liked instead.  I worked from the top down on this growth chart.


Working on the elephant. The "grain" of the paper ended up working so perfectly for this elephant!! It goes from right to left on the head and then tilted perfectly for the trunk. I will admit I didn't totally plan this but I love that it turned out so perfectly! I decided at the end to cut the notches into the trunk as well, which I really liked the outcome.


The adorable 3 monkeys! 1 and 2 have felt bellies.


The elephant was holding the string to the balloon.


The clouds are white felt and the numbers are a black velvet paper.


The FINISHED PRODUCT!!!!!!


***

I typically use plain little wooden birds, which I paint, as the height markers.  For this one, we talked about it and decided the alligator was super cute and worked with the jungle theme. We were deciding between the bumble bee (cute, but not as fitting), the alligator (cute and perfect), and the cloud (cute, but basic). I bought this completed alligator from Michael's and added the label area to its belly.


Thursday, June 7, 2012

Handmade, Personalized Children's Growth Chart - Jungle Fever!!

I made a growth chart last year for my cousin's little girl who was turning 1.  You can see the progress and details of her growth chart on this post on my blog! I really enjoyed doing it and thought it turned out really well.


So I did another growth chart, and this time I made it for my boss's baby boy who turned 1 this January.  We did her baby shower in a jungle theme, and she liked those animals and colors for him so I tried to stay with that theme. I also wanted to keep it really masculine for him.  Here is Emry's growth chart (sorry, iPhone photos!!!).


*********


This is pretty much how I start all of my growth charts. I buy a 24"x36" canvas from Hobby Lobby (a freaking amazing store because not only do they have good stuff, but their prices on canvases are awesome). I basically map out where everything is going to go on the canvas to see what will and will not fit.  I never stick exactly to my plan but I stay true to it for the most part so that nothing gets too out of whack at the end!! Nothing is more horrible than being almost finished and realizing you forgot something so I super-plan instead!! Here I have the bigger items mapped out and I am laying the giraffe spots out (without gluing them) to see how they look. 


I have started the sky by laying out blue tissue paper sheets one layer at a time until it's even.  I have roughly laid out where I want the yellow ripped scraps of paper for the giraffe's body.  I sometimes like doing this patchwork scrap method because it gives things nice texture.


I finished the sky by using blue tissue paper, and the giraffe's body. I didn't worry too much about covering the left side and left bottom area because I will cover those with the tree and the lion.  


Here I have laid out the spots, which I made from felt on paper, to make sure everything works together well.  


This is a close-up of the spots and yellow scraps laid out on the giraffe initially to see how everything is going to look.  You can see the lighter brown felt on the dark brown paper for the spots.  


I finished the giraffe and used a black button for his eye. I started the tree and the lion's body.  I put on the measuring lines, which measures in inches and has a thick line on each half foot and foot.  


I finished the tree, did more work on the lion's face, and have started the monkey who will hold the sign with Emry's name on it.  


Almost finished!! 


Here is the finished product.  A giraffe as the measuring guide, a monkey with a felt belly hanging from a tree, holding the EMRY sign, and a lion with a felt mane.  


Each piece is hand-cut and placed, and everything is uniquely made for this growth chart.  I really want to personalize these so the family has them for a long time as not only a growth chart but also as art for the child's room.  This growth chart has a jute cord on the back to hang from.  I started the measurement one foot off the ground so the bottom of the canvas would be 1', then the first displayed number is 2'.  I painted and used little wooden birds for the height markers.

I really enjoy making these and will probably start selling them on my Etsy store - MyVintageBird.


Monday, May 14, 2012

My, What a Fancy Dog You Have! PART 2

After thinking about it all morning and telling my mom about my morning craft project I decided to make her almost 1 year old Black Lab mix a couple of bright, beautiful bow-ties for my mom's upcoming wedding. I tried to pick colors that will really pop against his jet black fur! I don't think we will be able to have Moejoe (her dog) at the ceremony, but I really want to do engagement pictures/wedding pictures with all three of them (not in her white dress with a long-haired black dog though!) and put the bow-tie on MoeJoe to "up" the festivities. I will definitely post pictures of MoeJoe in his bow-tie as soon as I get them. :)


Saturday, May 12, 2012

My, What a Fancy Dog You Have!

I bought some amazing fabrics and set out to make some cute bow-tie dog collars for my dad's Jack Russell Terrier. This is meant to be a total gag gift/surprisingly awesome gift. I truly think my dad will use these bow-ties and the dog will look awesome.  I made the colorful, double-sided Dia de los Muertos bow-tie for more festive events, the hipster, flannel bow-tie for regular days, and the nautical-themed bow-tie for the summer... ;) They were super easy to make and I just bought a size small red collar from PetSmart.   I  used a snap to snap them onto the collar, which allows the bow-ties to be easily interchangeable!  


********


Dia de los Muertos - side one.


Dia de los Muertos - side two. 


Dia de los Muertos - full view, featured with red collar


"Hipster" flannel bow-tie.  


"Hipster" flannel bow-tie with snap.  Snap allows the bow-ties to be interchangeable.  


Nautical theme bow-tie.  


I will probably start selling some of these on my Etsy store - MyVintageBird


Saturday, April 7, 2012

Return of the Funky Site - Beyond the Picket Fence

It feels like forever since I've done a Funky Site and I've run across some really awesome sites lately, thanks to Pinterest!  The first Funky Site I want to feature is a blog called Beyond the Picket Fence, and this blogger has some amazing ideas and pieces. I really like the projects she posts and we have similar taste in styles.  She is great with re-purposing items and does some really neat work with re-purposed wood.


*****


This rolling side table is made from plywood then painted and aged.  I love this piece and the aged look and colors on it.  

This will be a side table between the couches...if I can actually make it look like this!


This is a close-up of a piece of wood she features in her tutorial on how to paint and age wood the way she does it.  I really like the way her pieces turn out so I'm going to have to try this technique! It really puts a great shabby chic, recycled look to the wood.


Some of my favorite things that I found on her blog were the pieces she makes out of recycled wood pallets.  Pallets are all over the place to it's awesome to see such beautiful pieces made out of them.  She made this amazing bench/side table out of a pallet and other pieces of plywood. I am in love with this piece and, once again, the colors used on it.  I think it's amazing that it's made from a recycled pallet, and I think it's amazing that it looks like a neat, vintage piece.

 She made this amazing bench.......


.....out of this pallet! I love it!! 


Continuing with her pieces made from pallets this book holder/shelf was also made from a recycled pallet.  She painted and aged this one the way she does her other pieces.  This is great for an entrance way, laundry room/mudroom area.  


*****

This is something she featured on another part of her blog that I thought was beautiful.  This is a beautiful space for a kitchen/dining room area.  This was originally from The Ironstone Nest


In the same post as the one above she featured this beautiful piece from Life as a Thrifter.  This beautiful canvas was made from recycled pallet wood.  This is all inspiring me to pick up hundreds of pallets and make things...........   :)


That's a little taste of this Funky Site. Make sure to check her out more at Beyond the Picket Fence!!!!!! 


Friday, March 30, 2012

Southern Spring Gardening


The last two weekends I have been working in my friend's parent's yard.  He lives with his parents and I offered to do some yard work for them - I garden vicariously through their yard because I only have an apartment porch!! My friend set a budget for a Mother's Day gift for his mom and we set to work! We set a budget of $150 originally but ended up getting another $50 to work with. We completed this beautiful, total transformation for only $200, which included plants, flowers, mulch, two pots, potting soil, solar-powered garden lights, and the black planting plastic!

I wanted to get planting early because in Alabama it gets hot very fast so it's best to get the plants in the ground early! It took two people over two whole days over two weekends to complete this project, and I survived but came out sunburned, sore, cut, blistered and bruised. It turned out really well though and I had a great time with my gardening weekends...! :)


Front Entrance Before:

This yard had been worked years ago but has recently been let go and weeds have taken over.  There was a huge, abandoned (thank god!) fire-ant hill next to the fence, but luckily we were able to get rid of that! The soil in areas is thick Alabama clay and was full of big roots.  You can see the overgrowth around the fence and against the house in this shot.  


We weed whacked all the overgrowth then created a planting area by just eyeing it and I used a shovel to carve out the outside edge.  I then tilled the area that was set to be the planting bed.  I ended up carving out more area than I originally planned - I added the front right entrance bed along the sidewalk (pictured in the bottom left of the photo).  We put down black planting plastic to prevent most of the weeds from growing and cut holes where we needed to plant things.   In this bed I used azaleas and lamb's ear in the back, and some tall white and pink flowers for the front.  


We covered the whole bed in a dark brown mulch, which gives it a really clean look.  I used beautiful red bricks to edge the planting beds.  I found the solar powered garden lights from Bed Bath and Beyond for $2.50 a piece! 


Here's a picture of the side bed on the left side of the entrance walk.  I weed whacked, removed the abandoned fire ant nest, and tilled the area to create the planter. Again, I laid the black planting plastic and planted the plants around it. 


I covered the bed in the same mulch and surrounded it with the bricks I got.  In this bed I planted grasses in the front, ground coverings in the middle, a stargazer lily, and pansies in the back.  


Here's a shot of the whole entrance way.  It looks so clean and fresh, and much more welcoming than before!!


Here's a shot of the front stoop.  I found these pots and filled them with grass, pansies and draping plants.  Next thing is to replace that front mat!! 


**********


Front Entrance Before:


This is a picture of the right side of the area we worked on.  There is a wider planting area that slopes down at the end.  My friend's mom already had two amazing rosemary bushes that we kept and used that area to create a small herb and fruit/vegetable garden.  You can see the overgrowth and leaves in this photo that his mom and I are working in.  We have our plants all lined up ready to go!


We weed whacked, tilled and carved out this planting area like we did with the other side.  Above the rosemary we planted strawberries, peppers, cilantro, lavender, basil, chives, and a blueberry bush.  We used the bricks and lights to edge this bed.


Here is a view up the walk towards the entrance. You can see the entire planting area around the house.  I used azaleas and lamb's ear to line the window area - the azaleas will get great height that will cover the bottom area of the house.  


Here's a shot of the azaleas along the house and the two entrance planting areas.