
I found this old wooden frame,


another wooden frame, a toy block pull cart, this vintage, gold angel boy, glasses from the 60s, and underneath some other ruined books these cool old books were untouched by the rain! (Sorry it's not a close-up!)

Last but not least, I found this beautiful rocking chair:

After I loaded it up in my car and took it home I began my research on the type of rocker this was. This is one of my favorite parts of picking - researching and learning the history of a piece, and in turn the history of its owner, the region, and so many other things. So bear with me - this is what I found out:
Lincoln Rockers are a reproduction of the rocking chair that President Abraham Lincoln was sitting in at the time of his assassination. Morbid, I know, but the design of these rockers is beautiful - known for their ornate, curved arms. This particular one has special details like the wooden spindles at the top and the metal rods along the sides.
This rocking chair was probably made in the early decades of the 1900s. It made its way to a farm in Berry, Alabama. I know that because along with the chair and other belongings I found, like the books, there was this slipped inside one of the daily planners:

It was reupholstered probably in the 1950s-1960s. Anyway, back to our regularly scheduled program, folks!
This antique Lincoln Rocker had been thrown out in the pile and had been rained on for days. I was afraid I wouldn't be able to salvage the wood.
The wood across the top looked like it was starting to splinter from all the water damage.

The wood along the side had split in half and was being held together by an amazing Frankenstein-like clamp.


So, now started the fun part! Time to take this thing apart and see what I was really working with!
This was definitely an at-home re-upholstery job! As I started removing the old, gross fabric I made some interested discoveries! This is a quilt that was used as cotton batting/stuffing for the seat back. It was very soiled from the rain. Yuck!

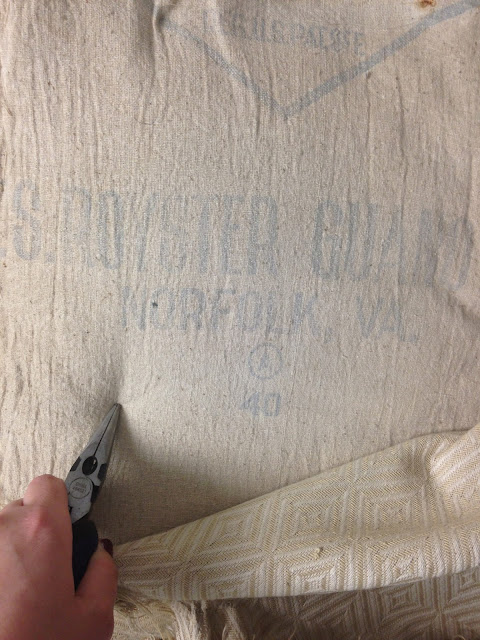
Then this amazing find on the seat cushion! Instead of using a piece of plain fabric to hold the cotton batting in place they used a piece of a fertilizer sack. This says "F.S. Royster Guano Co. Norfolk, VA". I love projects like this for this exact reason! What a cool find! Upon doing some research, this fertilizer company originated in Norfolk, VA in the 1800s and later opened a plant in Montgomery, AL where they produced fertilizer that was used on farms. This confirmed my thoughts that this chair had found its way to a farm in the Berry, Alabama area and this was an at-home re-upholstery job using whatever materials were convenient!
Once completely stripped of all the fabric I was able to clean up the chair and do some treatment to the wood. One of the best things for dried out wood is actually to put some olive oil on it! So I dripped olive oil on my finger and spread it on the little cracks in the wood. I then used Restor-A-Finish over the rest of the wood to help bring it back to life a bit. Looks nice, huh?

While the jute roping looks a little rough, it is actually in good condition. It's still very sturdy so I made the executive decision to not remove it and redo it at all.
I removed the Frankenstein/Forrest Gump metal brace from the side of the chair and used Wood Glue and a clamp to fix it. It still had a considerable crack in it so I had to use wood filler on it.


 There was also a tiny crack in the leg that I glued and clamped as well just to ensure no issues would creep up over time.


 So, in the past I have done all my upholstery with additional hands. No, I did not have additional hands myself at the time, although it is a deformation I think at this point I would gladly take! I had always had the help from someone else, which is really an enormous help when you are stretching the fabric, holding it down to staple, keeping it even, and ESPECIALLY, when you are working with trying to keep stripes straight......! Needless to say, it was difficult with only my measly two hands, but I made it work!
Here is the reupholstered chair once I got everything stapled into place.


At this point I am almost finished but I have to add some finishing touches. I hammered in some upholstery tacks to cover the staples and to further secure the fabric. There are a couple tacktics.. get it?? Wooo...dad joke.. Anyway... There are a couple of ways in which you can hammer in the upholstery tacks to make it a little easier on yourself. I hold them with pliers and hammer them to keep them straight and to protect my fingers.
There were a couple spots where there were slight damages to the internal wood frame and the tack wouldn't hold tight enough. Because the fabric was secured well enough by the other tacks, I wasn't as worried with the 5 or so missing areas. So I just glued tack heads in the open spaces for appearance reasons.


I loved the way the cording, or welting, turned out on the back! So I'm finished with my beautiful Lincoln Rocker! Here's a before and after to really appreciate the transformation!!
Yikes to yes!!

What do you think about this transformation??

The wood across the top looked like it was starting to splinter from all the water damage.

The wood along the side had split in half and was being held together by an amazing Frankenstein-like clamp.


The fabric was extremely dirty, but the jute was actually in good condition.

So, now started the fun part! Time to take this thing apart and see what I was really working with!
This was definitely an at-home re-upholstery job! As I started removing the old, gross fabric I made some interested discoveries! This is a quilt that was used as cotton batting/stuffing for the seat back. It was very soiled from the rain. Yuck!

Then this amazing find on the seat cushion! Instead of using a piece of plain fabric to hold the cotton batting in place they used a piece of a fertilizer sack. This says "F.S. Royster Guano Co. Norfolk, VA". I love projects like this for this exact reason! What a cool find! Upon doing some research, this fertilizer company originated in Norfolk, VA in the 1800s and later opened a plant in Montgomery, AL where they produced fertilizer that was used on farms. This confirmed my thoughts that this chair had found its way to a farm in the Berry, Alabama area and this was an at-home re-upholstery job using whatever materials were convenient!

Once completely stripped of all the fabric I was able to clean up the chair and do some treatment to the wood. One of the best things for dried out wood is actually to put some olive oil on it! So I dripped olive oil on my finger and spread it on the little cracks in the wood. I then used Restor-A-Finish

While the jute roping looks a little rough, it is actually in good condition. It's still very sturdy so I made the executive decision to not remove it and redo it at all.
I removed the Frankenstein/Forrest Gump metal brace from the side of the chair and used Wood Glue


Once dried and sanded down, I stained it to match the wood. You can barely tell the difference!!


I then filled the little remaining area with wood filler. I stained this to match as well.

Now that I was finished with bones of the chair, I was ready to work on the upholstery! Debbie sent me this great grain sack fabric that she got at an antique store in Northern Virginia. It was exactly what I was looking for. It works with the farm feel of the chair and it's a great cream color with a pop of the red. Here I am trying to figure out which direction to place it. I'll be honest. The main reason I considered the bottom option was to not have to deal with the pain of lining up the stripes..... I decided against my laziness and went with the top option!


Here is the reupholstered chair once I got everything stapled into place.


At this point I am almost finished but I have to add some finishing touches. I hammered in some upholstery tacks to cover the staples and to further secure the fabric. There are a couple tacktics.. get it?? Wooo...dad joke.. Anyway... There are a couple of ways in which you can hammer in the upholstery tacks to make it a little easier on yourself. I hold them with pliers and hammer them to keep them straight and to protect my fingers.
There were a couple spots where there were slight damages to the internal wood frame and the tack wouldn't hold tight enough. Because the fabric was secured well enough by the other tacks, I wasn't as worried with the 5 or so missing areas. So I just glued tack heads in the open spaces for appearance reasons.


I sewed cording from the same grain sack fabric and attached it on the back to cover the staples.


Yikes to yes!!

What do you think about this transformation??