Saturday, May 28, 2011

Double Funky Site!

This go 'round, I'm doing a bit of a double Funky Site.  I'm doing a Funky Site by way of another Über Funky Site! First, I have to give a shout out to HGTV's Blog, "Design Happens" - I love this blog and all the places it leads me. They have great ideas and great taste of what's interesting and attractive.  It is kind of a Permanent Funky Site on my list!  Before I do my second and actual Funky Site of this post I am going to give a quick little feature of what kinds of awesome things can be found at HGTV'S Blog - interior/exterior design ideas, interesting finds, and Do-It-Yourself projects. I am not going to designate a whole Funky Site, because there's just too much, and it's added to everyday, but I'm sure I will mention it again and I am seriously encouraging you to visit it!! 


Some of the items featured on their blog are more of "dream" items for me... like this amazing lounge chair with a canopy to cover you from the sun when you need it. This piece is beautiful and so classy. I love the bright red pillows! 
Modani sells these amazing love seats.
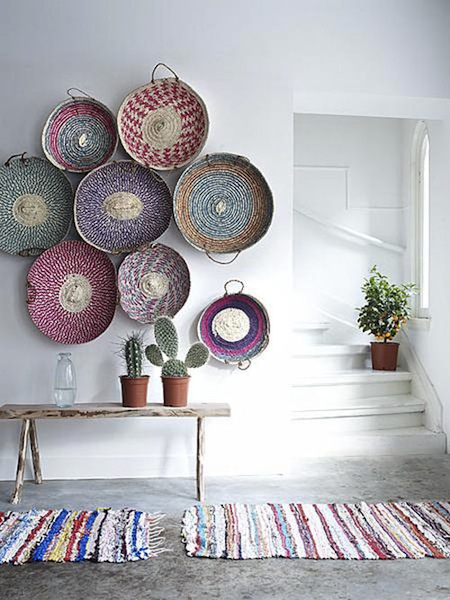


Other ideas featured on their blogs are more attainable for me.  This is a colorful and visually stunning way to decorate with baskets.  I have a soft spot in my heart for baskets because my grandma weaves beautiful baskets. I also love the woven rugs and rustic wood table they feature in the picture.


This is another interior design that I love. It's so rustic, but so clean. From the detailed, antique-like mirror to the rustic table and weathered pots, the clean, white hardwood floors and the worn bedframe, all look great in the bright space they are in.  I love the addition of fresh-cut white tulips!!


These shiny, "Oscar the Grouch homes" are amazing as planters!! This is such a clever idea! The colors pop so well against the clean silver.  This is a fun and easy DIY project from their site.  They suggest you screw on the wheels, which can be optional.  For the larger cans, they fill the bottom 1/2 to 2/3 of the way with empty 2-liter bottles then start adding dirt - a nice way to take up the space and utilize recyclables. I wish I had space to do something like this!
For instructions on how to do this, go here!


The last item for HGTV's Funky Site leads into my main Funky Site feature. These amazing glass bubbles are from West Elm.  Practically floating in them are air ferns, which basically live off of air, only needing a little water on the base once a week.  This looks so other-worldly and alien-like. I ended up buying the two smaller round ones and bought air ferns from an online store....!!! I am extremely excited to put these wild things up. 

This purchase leads me to my main Funky Site....


The ever-amazing HGTV Design Blog has led me to an amazing store called West Elm.  They have great furniture, accessories and ideas. I bought my amazing glass bubbles (above) from their site! They have a lot of other great items. Let me show you...   :)


Bubbles Ceramic Side Table

This is a really unique ceramic side table. It can be beachy or kind of vintage, shabby chic.
Natural Tree-Stump Side Table
I also love this tree stump side table.  It's so rustic but I think still works perfectly with so many different styles. I think it would look great even with the ceramic side table above.


Round Coco Mirror

At first sight I wasn't sure about this mirror, but I love it now. This is a "round coco mirror" and it's made out of dried coconut pieces!


Angle Nesting Shelves

This is so quirky and fun. It adds a great flare and style to shelves.


Elton Settee

This is a dream item for me, but an absolutely beautiful and classy settee none the less.  It would look great paired with pillows with bright, bold patterns.


West Elm has some great pillows along with other home accessories.


I think bright patterned pillows matched with a bold colored pillow work perfectly on a white couch.


Recycled-Glass Bud Vases

Even these little recycled-glass bud vases are great. They're perfect little vases to display fresh wildflowers around your house. Right now they are on sale for only $3.99!!


Glass Teardrop Table Lamp

This is another great accessory they have.  These glass teardrop table lamps come with a raffia shade.  I love the right one with butterflies in it!!


Jason Polan Botanical Dessert Plates

West Elm also has beautiful plateware designs.  I love this Jason Polan Botanical Dessert Plate.


Henna Dessert Plates

This Henna Dessert Plate has a beautiful and interesting design.  A good alternative to plain, white plates.

**********

West Elm also has a great section called We Love where they feature information on the artists featured in their collections, behind the scenes videos, and local guides to cities they consider home.



Sunday, May 8, 2011

MY Birmingham

  I have lived in Birmingham now for right about 3 years.  Within the last year and a half I have finally had enough money (non-AmeriCorps stipend now!) and opportunity to really check out Birmingham.  I have kind of mapped out the areas of Birmingham that I frequent or that make Birmingham the city it is to me.
  Birmingham is a small, big city.  It is a big city in that it is relatively well-known, with a downtown full of high rises, and a bustling university and hospital system.  Despite that, Birmingham can feel surprising small sometimes.  Within Birmingham, everyone knows everyone else, or at least someone they know.  The city shuts down on the weekends, especially on Sundays, and there are blocks of beautiful architecture and potential life that are virtually empty.
  I am not complaining about Birmingham, but merely pointing out what I notice.  I actually think Birmingham is growing and will continue to grow into a cooler city than it already is.  The longer I live here, and work in downtown, the more I discover new places and appreciate Birmingham.  The trick is finding the best places to go - below is a map of MY Birmingham and my favorite areas to be.


  This is the downtown Birmingham that I know.  I work at the YWCA on the North side in the heart of the downtown high rises, near the courts and Loft District.  We are only a couple blocks from Sloss Furnaces, an old blast furnace in the middle of the city. As you cross over the railroad tracks you get into the South side.  They recently built Railroad Park, which is an awesome green space in the middle of the city.  They have done an amazing job with play areas, walking paths and a pavilion. It has begun to bring tons of people into the city and they are talking about what new feature to put next to it now.  Even though I don't go to UAB, the University and the hospital system brings in tons of people - many young and progressive - which helps make up a large part of Birmingham's culture and economic life.  Right in the University area is Five Points.  Although Five Points can feel a little lackluster at times, it can be a pretty nice area and has great potential to become a serious nightlife hot spot in Birmingham. East of the UAB and Five Points area is the Highlands area with great parks and beautiful homes.  

*******


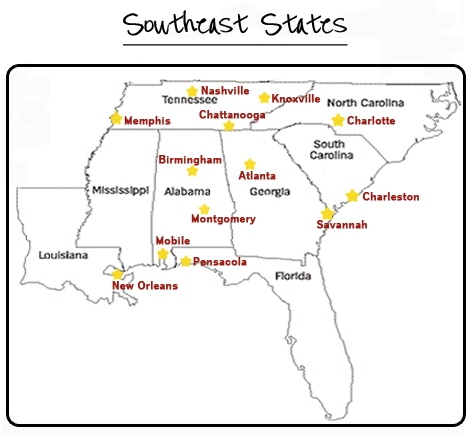
Another big reason I love living here in Birmingham is how close we are to some of the coolest cities in America.  The map shows the distance Birmingham is to a load of great cities.  Here's a breakdown of how far we are to certain things:
  *Birmingham to Atlanta - 2.5 hours
  *Birmingham to Mobile/Pensacola/The Gulf Coast(BEACH!!) - 4 - 4.5 hours
  *Birmingham to New Orleans - 5 hours
  *Birmingham to Memphis - 4 hours
  *Birmingham to Chattanooga - 2.5 hours


I won't go through and list everything, but the farthest distance is Birmingham to Charleston with about 8 hours.  In other words, we are within an easy drive to some awesome cities.  In less than 3 hours we can head north to Chattanooga and go camping in the mountains; and in about 4.5 hours we can be down at the Gulf Coast on the white sand beaches.  We are so close to amazing cultural cities like Memphis and New Orleans.  My friend and I have a list about 6 months long of all the places we need to go on the weekends.  There are not many areas of the U.S. where you are within such short drives to some really awesome places. Having said all of that, I will now include my travel to regional areas in the "My Birmingham" section because it is one of the things that Birmingham offers. 

********

All in all, I think people underestimate Birmingham - both residents and outsiders.  It has an amazing amount of history and charm.  It's actually a very cool city and is continually growing to become better. 


Wednesday, April 27, 2011

Spring Wildflowers

It's spring and it's beautiful in Birmingham.  It has been so sunny and warm and we've had plenty of chances to get outside.  There are wildflowers popping up everywhere and I've taken advantage of this to create fresh wildflower bouquets to lighten up my home!!


This is a wildflower bouquet that I gathered at Moss Park in Hoover.  Love it!!!


Here's the wildflower bouquet in a vase at home.


This admittedly is not a flower I picked - I bought this big, beautiful flower from a wild, homeless man in 5 Points in downtown Birmingham. I was out to dinner with a friend and he was selling these for a dollar! He was a hilarious, sweet man and this awesome flower lasted a week and a half in my living room.


Saturday, April 23, 2011

New Orleans Inspirations

I went to New Orleans the week before Mardi Gras during all the parades. My friend and I had a great time walking around the French Quarter, buying art and seeing the mayhem of pre-Mardi Gras.  These are a couple of things I saw there that I loved.


This was an amazing door for an empty building.  This is seriously one of the most beautiful and intricate doors I have ever seen - I was really tempted to rip it right off that building.


This was a spray painted stencil on Chartres St. 


Perfect symmetry and very stereotypical New Orleans (at least for a tourist!). Art on Jackson Square with a horse-drawn carriage and a New Orleans police bus.  


Gator heads and claw back scratchers in the French Market...


Friday, April 15, 2011

Sloss Furnace

Sloss Furnace is an awesome, ominous, industrial landmark in Birmingham.  Photos of Sloss and it's blast furnaces, water tower and buildings are totally iconic in Birmingham.  It's an old blast furnace that was a big part of Birmingham's steel industry.  You are able to walk around freely and check everything out. It's apparently one of the most haunted places in the United States and they have events all throughout Halloween.  It's super creepy, and yet beautifully amazing, all at the same time.  Here are my shots of Sloss.


Entering Sloss.


Blast furnace.


Monday, April 11, 2011

Beer Bottle Label

My mom asked me to try designing a beer bottle label for her boyfriend's son who is getting married in May.  They were going to the couple's wedding party and wanted to give them a 6-pack with personalized labels on them.  They wanted to include a picture of the couple as well as their dog, Trigger, a lab/Australian Sheppard mix, who in an integral part of the family now!! My brother works at Thirsty Dog Brewing Co. in Akron, where they all live, and bought a 6-pack of Labrador Lager, which ended up matching perfectly in both theme and color.
  My mom peeled off the labels from the Lager, printed out my labels on a label paper with a good printer, and placed these on over top. Their name ended up looking like a legitimate beer name!


On the back I added a solo picture of Trigger along with their names, wedding date and some other little details.  I put a recycle symbol, weight and bar code to make it a bit more realistic looking.  They are both in the Air Force so I used that logo, and it blends well with the other details.  
Here are pictures my brother took with a camera on his phone of the end result. Gives you a little taste of what they ended up looking like as actual labels.


You can see how well the front label matches the Labrador Lager sticker up top - and not even on purpose!!! 


Saturday, March 19, 2011

Distressed Guitar

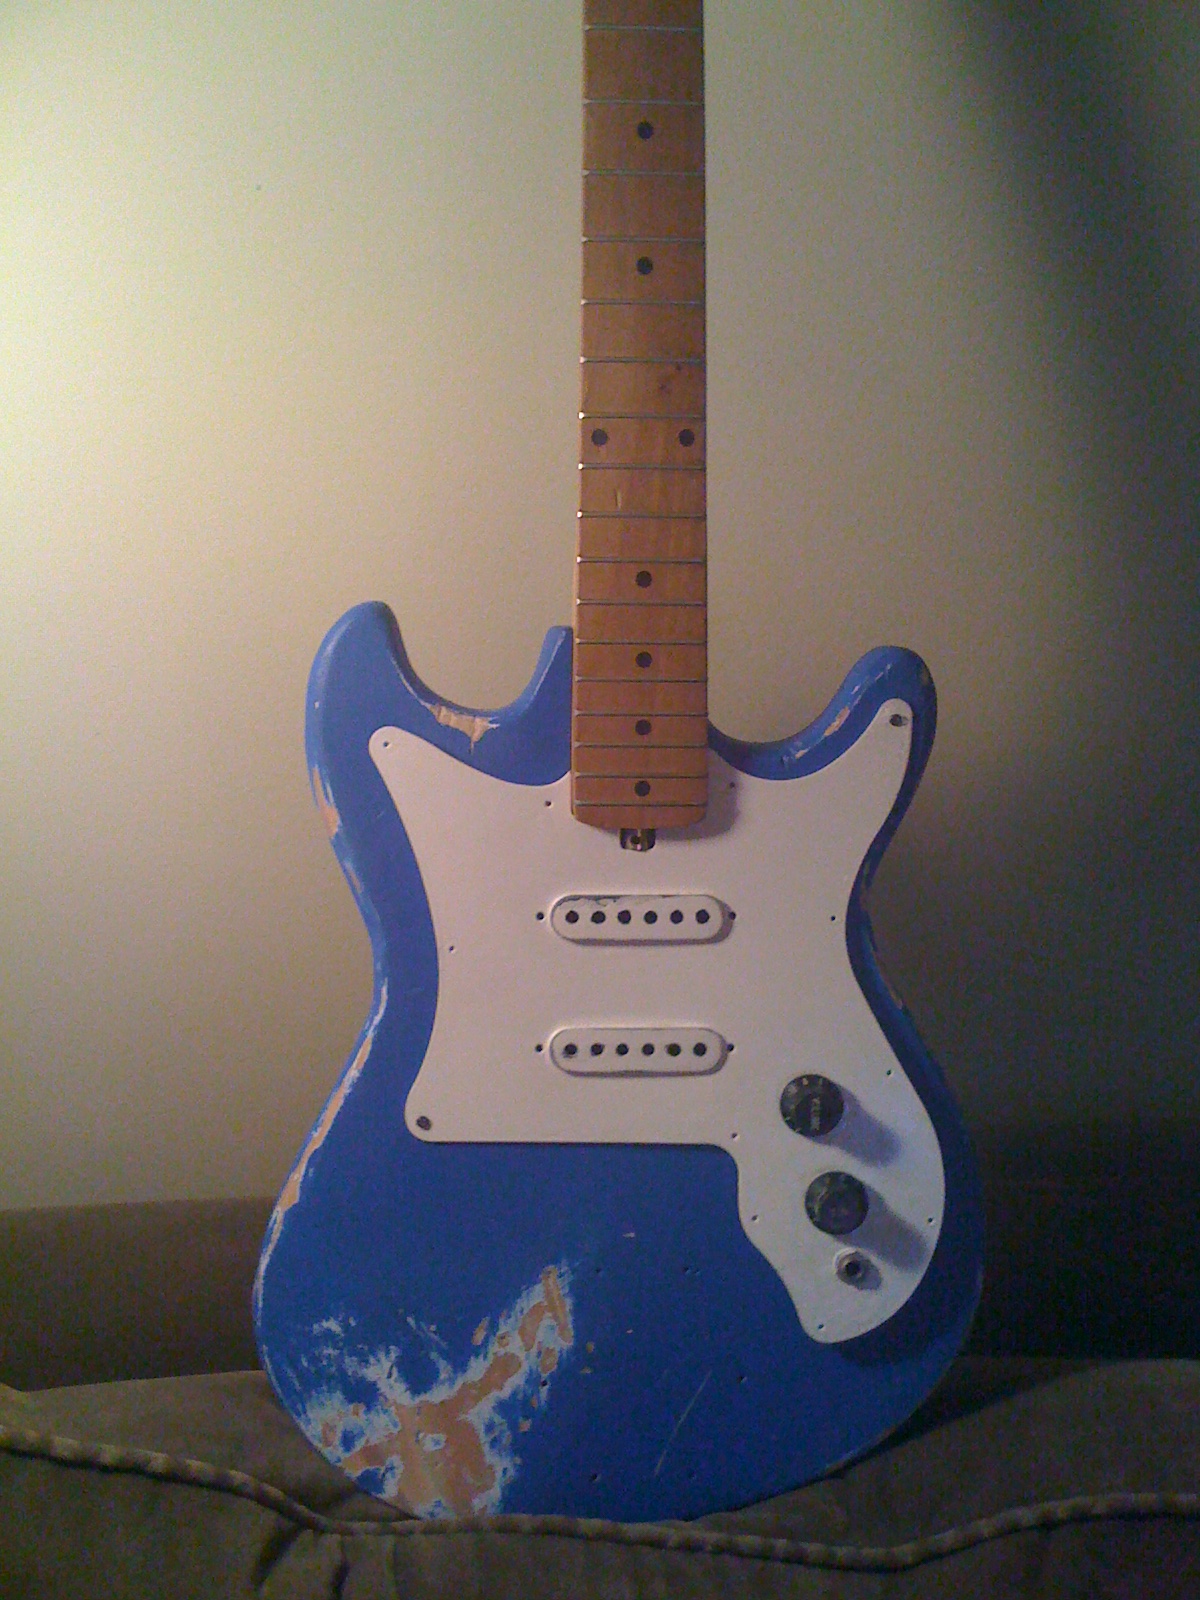
Here are pictures of the finished product from the  guitar that my brother gave to me to redo for him. 
Check out the process below!


**ORIGINAL POST**January 10, 2011**

In the December 2010 issue of Guitarist magazine my brother, Adam, spotted something he liked. He ripped out two pages and handed them to me and said, "Do this" (you have to know my brother). A while ago, he had given me a Harmony electric guitar he had gotten from a friend years ago. All the hardware was missing or broken and he had carved his and Eric Clapton's initials all over the guitar (once again, you have to know Adam). He had asked me to paint it, design it, do whatever I wanted to it. I put it in my craft area and left it untouched for over a year now - every once in a while I'd pick it up waiting for inspiration... and nothing. I didn't want to do anything too tacky or young. I wanted it to be something he could keep his whole life and it would never lose it's relevance. In other words, I wanted to do something timeless, and I think this idea of "relic-ing" the guitar is perfect for him.  Of course, Guitarist was displaying '60s Fenders and I'm working with a 1992 (?) Harmony. It's still turning out well so far...

This is one of the guitars featured in Guitarist magazine. This is the one my brother really liked, without the "extreme relic" on the back, so this is about what I'm going for.


First thing's first, gotta take the old one apart.  You can see the E C carving in the front and an A in the top left.  There were also some scratches and initials in the pickguard (the black part). I unscrewed it all to sand and paint. 


This is the beginning stages of sanding. I'm using a round power sander with 40-grit sand paper. I loved this half-way look - I was tempted to keep it like this.  I have to sand the pickguard a little bit with fine grit sandpaper so the spray paint sticks.  I'll then spray the paint on evenly for about 4 or 5 coats. 


I put the guitar together just to check it out.


Here's the guitar sanded down bare.  The pickguard is painted white - only 3 coats at this point.  I'll do another 2 coats probably.  Once again, I love this version. I really want to keep it bare with the white and silver accents.  I love the bare light wood. 


I put the pickguard on to really see the white with the bare wood.  I love this!! Next step is priming and painting though. Then I have to distress it a bit to give it the worn look. 


This project will take some time and be delayed a little bit because of the weather.  I don't have a heated space to spray paint so I have to wait until the weather warms up a bit in order to start priming and painting the body.  I've been working slowly at getting the pick guard painted.


Progress to come!!!


**March 19, 2011**

I started working on the guitar again and began with the painting stage. I got both white and blue paint (even though the blue paint had a primer in it) because I wanted to have the base of white so when I sanded down the blue layer the white would show through. 

This is the plain white on the back. The front and sides have already been painted. 


This is the finished blue guitar before any distressing. 


I put the pickguard on to check out how it looked. I love the contrast, and once I peeled the tape off the knobs I think the black is another great contrast. 


I screwed the neck back on because I wanted to be able to hold the guitar and see where the most wear and tear would happen naturally as the guitar would be held and played.  I wanted to make it look like this guitar had been on tour, or heavily used, for years. 


I started relic-ing, or distressing, the guitar by basically beating it up.  I smacked it with just about anything I could find, but mostly screwdrivers, wrenches, and a chain.  I started on the front. I began sanding down heavily rubbed areas (where the right forearm goes across to strum) with a fine-grit sandpaper, steel wool, and a wire brush. 


I then moved on to the back of the guitar.  I focused on the spots where the chest and hip rub against the back.  I used the same technique as I did on the front. I basically used anything I could find to start distressing and create nicks.  Then I followed up with wearing the areas down with sandpaper, steel wool and a wire brush.   

I did all the same things around the sides and edges.


And again, here are shots of the final product - front and back.


I love the guitar and my brother is very happy with it.  He's going to work on the hardware and electronics and get it back functioning.  I'm definitely on the look out to do another one in the future!