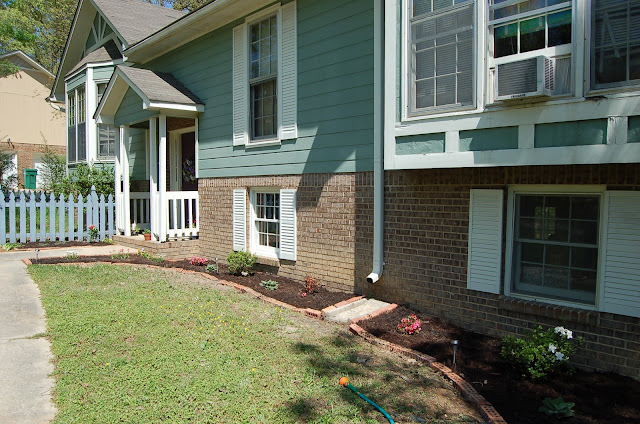
The last two weekends I have been working in my friend's parent's yard. He lives with his parents and I offered to do some yard work for them - I garden vicariously through their yard because I only have an apartment porch!! My friend set a budget for a Mother's Day gift for his mom and we set to work! We set a budget of $150 originally but ended up getting another $50 to work with. We completed this beautiful, total transformation for only $200, which included plants, flowers, mulch, two pots, potting soil, solar-powered garden lights, and the black planting plastic!
I wanted to get planting early because in Alabama it gets hot very fast so it's best to get the plants in the ground early! It took two people over two whole days over two weekends to complete this project, and I survived but came out sunburned, sore, cut, blistered and bruised. It turned out really well though and I had a great time with my gardening weekends...! :)
Front Entrance Before:
This yard had been worked years ago but has recently been let go and weeds have taken over. There was a huge, abandoned (thank god!) fire-ant hill next to the fence, but luckily we were able to get rid of that! The soil in areas is thick Alabama clay and was full of big roots. You can see the overgrowth around the fence and against the house in this shot.

We weed whacked all the overgrowth then created a planting area by just eyeing it and I used a shovel to carve out the outside edge. I then tilled the area that was set to be the planting bed. I ended up carving out more area than I originally planned - I added the front right entrance bed along the sidewalk (pictured in the bottom left of the photo). We put down black planting plastic to prevent most of the weeds from growing and cut holes where we needed to plant things. In this bed I used azaleas and lamb's ear in the back, and some tall white and pink flowers for the front.
We covered the whole bed in a dark brown mulch, which gives it a really clean look. I used beautiful red bricks to edge the planting beds. I found the solar powered garden lights from Bed Bath and Beyond for $2.50 a piece!
Here's a picture of the side bed on the left side of the entrance walk. I weed whacked, removed the abandoned fire ant nest, and tilled the area to create the planter. Again, I laid the black planting plastic and planted the plants around it.
I covered the bed in the same mulch and surrounded it with the bricks I got. In this bed I planted grasses in the front, ground coverings in the middle, a stargazer lily, and pansies in the back.
Here's a shot of the whole entrance way. It looks so clean and fresh, and much more welcoming than before!!
Here's a shot of the front stoop. I found these pots and filled them with grass, pansies and draping plants. Next thing is to replace that front mat!!
**********
Front Entrance Before:
This is a picture of the right side of the area we worked on. There is a wider planting area that slopes down at the end. My friend's mom already had two amazing rosemary bushes that we kept and used that area to create a small herb and fruit/vegetable garden. You can see the overgrowth and leaves in this photo that his mom and I are working in. We have our plants all lined up ready to go!
We weed whacked, tilled and carved out this planting area like we did with the other side. Above the rosemary we planted strawberries, peppers, cilantro, lavender, basil, chives, and a blueberry bush. We used the bricks and lights to edge this bed.
Here is a view up the walk towards the entrance. You can see the entire planting area around the house. I used azaleas and lamb's ear to line the window area - the azaleas will get great height that will cover the bottom area of the house.
Here's a shot of the azaleas along the house and the two entrance planting areas.


